Desert Treasure II - The Fallen Empire
After months of anticipation, Old School's most ambitious quest to date is finally here. Get ready for Desert Treasure II – The Fallen Empire!

We’ve already covered a lot of this information in our recent ‘Get Ready for Desert Treasure II’ newspost, but we’ll repeat it here so that everyone has a chance to see it before they play the quest.
This week sees the launch of Old School RuneScape’s biggest (and hopefully best) quest to date. Before you head to the desert to get started, there are a few things we’d like you to know.
Firstly, we have an ominous warning. If you are a Hardcore or Group Hardcore Ironman, we strongly advise that you play through the quest on a non-Hardcore account first. We’re not just building hype here: Desert Treasure II is a dangerous quest. Everything from the bosses we’ve spoken so much about to the environment itself can and will kill you.
Consider this your last warning. We expect Death’s Office to be full to bursting by the end of the day…
Secondly, we aren’t kidding when we say this quest is our biggest yet. Desert Treasure II will take you on an epic journey across Gielinor, from familiar locales to places you’ve never seen before. You’ll fight four tough bosses – Duke Sucellus, Vardorvis, the Leviathan and the Whisperer – and encounter plenty of other challenges along the way. You’ll run into familiar faces, and be introduced to new characters with their own stories, secrets and motivations.
In short, if you were planning to spacebar through the whole thing in two hours, we’re afraid you might have to adjust your schedule. You can of course play through the quest exactly as you want (yes, even you cheeky spacebarrers), but for those happy to go at a slower pace, we'd highly recommend you take your time and really savour our most ambitious quest to date. It’s absolutely dripping with lore, answers to unanswered questions, and ties to loose ends.
Make sure to take your time and look around, the best way to get one over on the bosses throughout the quest is to look for extra clues, pay attention, and obtain as much information as possible.
There’s so much to explore, and plenty of secrets tucked away for our most eagle-eyed players to find. The music and audio is some of the best we’ve ever heard from the Audio Team, so you’ll want to turn your volume up too. Basically, this is Old School storytelling at its very best, and we’re thrilled beyond words for you to finally experience it.
Don’t believe us? Hear it from Mod Ed himself:
"When you think about RuneScape's most iconic quests, there's a pretty good chance the Mahjarrat story will be one of the first to come to mind. While Guthix Sleeps, Ritual of the Mahjarrat, and indeed, Desert Treasure, are regularly considered some of the finest quests ever made. Now, all these years later, we're finally revisiting those epic stories with our own take on the legendary Mahjarrat.
Earlier this year, we made our first foray into the Mahjarrat storyline with Secrets of the North, but that was nothing compared to the might of this next instalment. This is a story we've been wanting to tell for years, and it's only through your tremendous support for our past storytelling efforts that we're now finally able to do so. We've made sure to honour the deep legacy of the Mahjarrat storyline, whilst also pushing the boundaries for storytelling in Old School like never before. Whatever you might be expecting, you're probably not ready for this. This is the one where everything changes. So, from myself and the rest of the team, it's an honour to be able to finally share Desert Treasure II – The Fallen Empire with you."
Mod Ed
If you'd like to hear more from the team, and even a couple of playtesters, check out our recent Dev Diary!
As a heads-up from us, we want as many people as possible to be able to experience Desert Treasure II spoiler-free. Of course, you're welcome to seek out discussion from other players if you'd like, but we won't be posting or sharing anything that divulges information about the quest until next week.
We'll still be keeping an eye on all of your feedback and fixing any bugs or making small tweaks for QoL purposes during the first week as per usual. However, unless something is clearly miles away from our expectations (and our own experiences testing the bosses), we don't plan on making any balancing changes until at least the second week following the release.
The bosses are supposed to be challenging. We want to give you time to learn their mechanics, put together gear setups and get familiar with the bosses so that overcoming them feels like an accomplishment, rather than knee-jerk any changes and deprive players the feeling of a hard-fought victory.
It's not all doom and gloom though, your death fees will be reduced at each of the post-quest bosses until you've racked up 5 kills. From there, stay alive or be prepared to pay up!
Now for every spacebar warrior's worst enemy...
During Gielinor's Second Age, the world was dominated by an empire the likes of which had never been seen. The areas now known as Asgarnia, Misthalin and even the Wilderness all once flourished under the banner of the Empty Lord. With the grand city of Senntisten at its heart, this civilisation washed over Gielinor like an unstoppable tide, pushing the boundaries of magic and science, while crushing any who stood in their way.
Fast forward to today, the Fifth Age, and you won't find much trace of this ancient empire. Indeed, Saradominists and Zamorakians alike have spent many lifetimes purging all remnants of it. However, small fragments of this fallen empire remain, for those who know where to look.
Perhaps you’ve already encountered some of these remains. Maybe you’ve met the monstrous Nex, sealed behind the Frozen Door for millennia. Or perhaps you’ve visited the bandits of the Kharidian Desert, the final human followers of the Empty Lord. You might even have encountered some mysterious Mahjarrat hidden away beneath those same sands. However, there are other parts of this forgotten empire that even you won’t have encountered yet. For example, this story begins deep in the desert, within a mysterious vault…
(If you're looking for even more backstory, check out this video made by PoisonedPotion to get you up to speed!)
You’ll need to brush up on your Mahjarrat knowledge before you start Desert Treasure II, so you’ll need to complete the following quests:
- Desert Treasure I
- Secrets of the North
- Enakhra's Lament
- Temple of the Eye
- The Garden of Death
- Below Ice Mountain
- His Faithful Servants
You'll also need to be sufficiently experienced in a number of skills to stand any chance at gaining access to the contents of the ancient vault:
- 75 Firemaking
- 75 Magic
- 70 Thieving
- 62 Herblore
- 60 Runecraft
- 60 Construction
As a reminder, none of these requirements are boostable. We hope you enjoy having the cold of the Wintertodt seep into your bones!
To start the quest, get yourself over to the Ancient Vault, which can be found north-east of Nardah, south of the Ruins of Uzer.
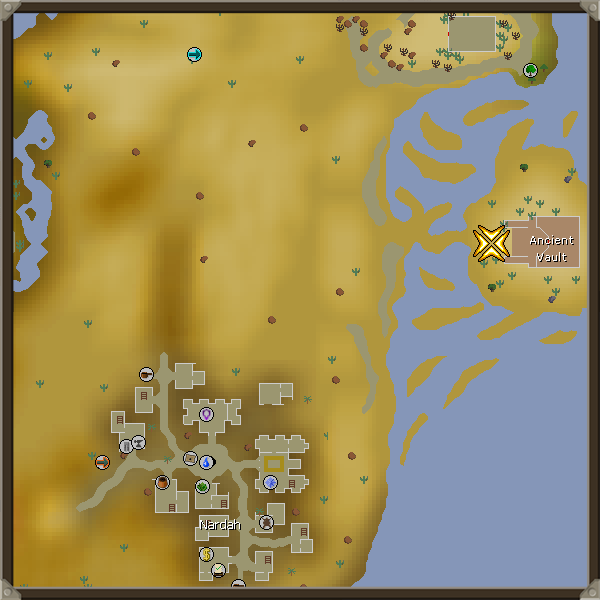
If you need a visual, here's where you can start the quest!
At this point you should be familiar with these, but just in case, let’s have one more look at the quest rewards!
Ring of Shadows

The Ring of Shadows serves as a one-stop-shop for various unlockable boss teleports and some offensive stats for players who are being particularly cautious with their GP.
Since the ring is untradeable, you'll be able to reobtain it for a fee if you ever misplace it, whether that's through sheer forgetfulness or an untimely PvP death.
The rest of the rewards in this section will come from the bosses unlocked upon quest completion. Starting with...
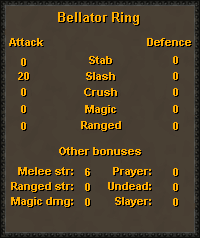
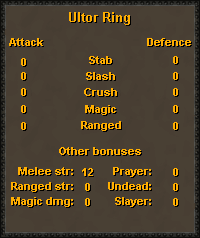
Four New Rings
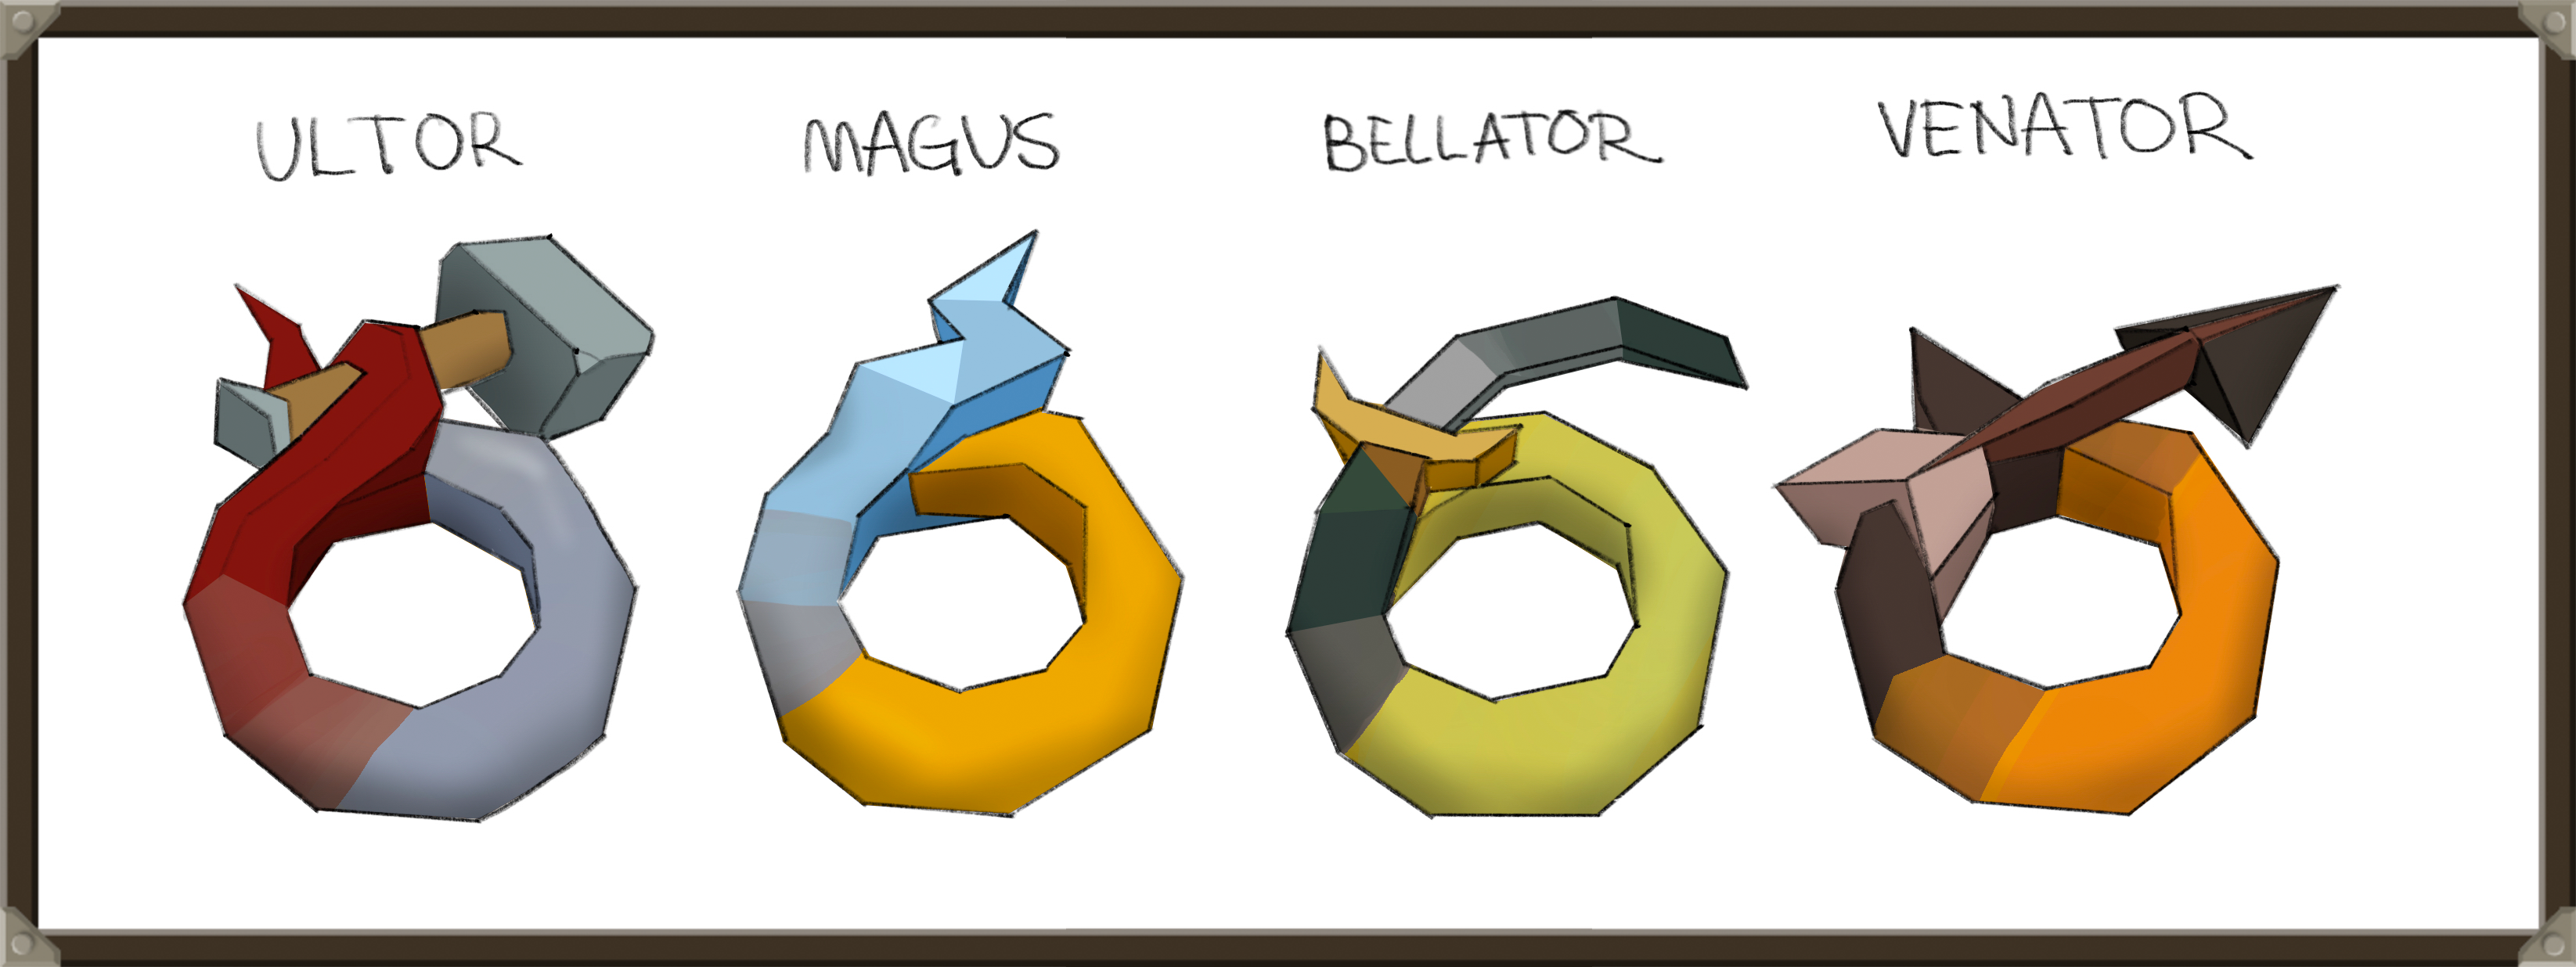
The Fremennik Rings have remained the best style-specific rings since the ancient era of 2005. Duke Sucellus, Vardorvis, the Leviathan and the Whisperer will each drop upgrade components used to create the powerful new Bellator, Magus, Ultor and Venator rings, which should shake up this age-old meta.

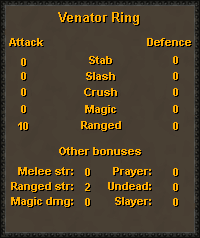
The completed Rings are all tradeable, but require completion of Desert Treasure II - The Fallen Empire to equip.
The bosses will also drop untradeable Vestiges, specific to each boss. To make these tradeable, you'll have to do a spot of handicrafts – to do so, you’ll need 90 Magic and 80 Crafting (both boostable). We'll give you a quick breakdown of how this works, should you be lucky enough to snag a Vestige on release day!
- Each boss drops a specific, untradeable vestige. Depending on the boss you're killing, this will be a Bellator, Magus, Ultor or Venator Vestige.
- Each boss drops tradeable bars. These are non-specific - all of the bosses can drop the exact same bars, or you can buy them from other players.
- Fremennik Rings can be broken down to provide their respective Icon. You'll want the Icon that corresponds to the Ring you're trying to make:
- Warrior Icon for Bellator Ring
- Seers’ Icon for Magus Ring
- Berserker Icon for Ultor Ring
- Archers’ Icon for Venator Ring
- Combine your Vestige, three bars, and your Fremennik Icon to create your brand-new Ring!
Of course, crafting like this hasn't occurred on Gielinor for a very long time. Perhaps it might be worth seeking out a particularly knowledgable Fremennik to learn a little more about these rings before getting started?
Now, what are the Mahjarrat without a spot of Ancient Magicks? You guys have Ancients, right?
Virtus Robes
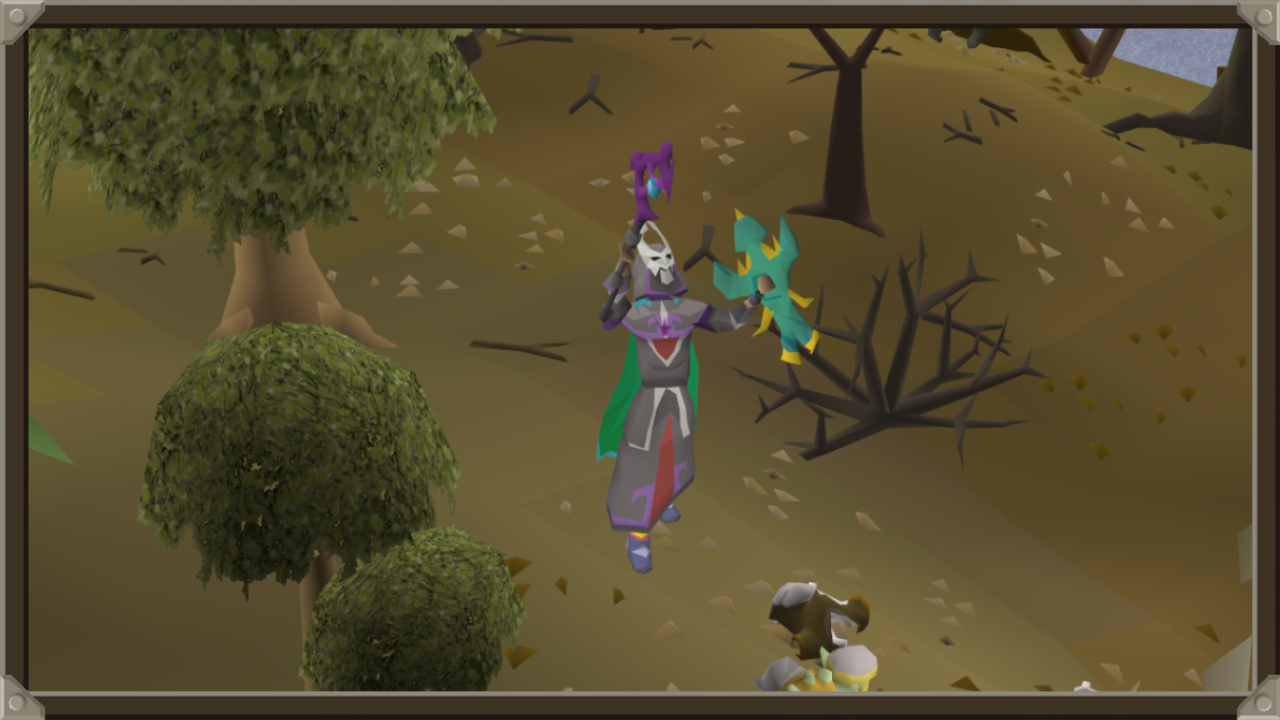
Virtus Robes are making a return, offering massive increases to Ancient Magicks damage while serving as a middle-ground between Ahrim's Robes and Ancestral when using Standard spells or powered staves.
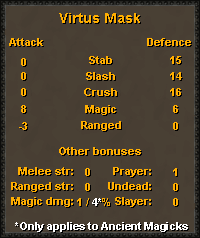
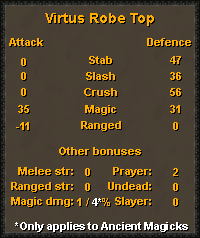
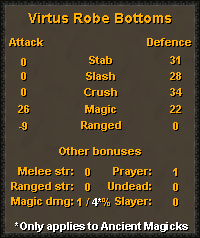
Each piece of the Virtus Robes set is tradeable and does not require completion of Desert Treasure II - The Fallen Empire to equip.
Each of the bosses has a chance to drop a piece, so if you wind up enjoying one of them more than the other three, you'll be able to farm it to your heart's content while hunting the full set!
Maybe Magic isn't your thing? Perhaps you prefer the simplicity of hitting things with a really big axe? Boy, do we have news for you…
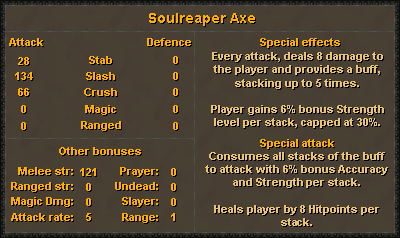
Soulreaper Axe
The Soulreaper Axe is a hefty 2-handed weapon that’ll really give you the edge in combat… for a price.
Before we get much deeper into the details though, we'd love to shoutout Deztroyer, who has already made a massive version of the Soulreaper axe in the real world! Check it out here.
Attacks with the Soulreaper Axe will damage you for 8 Hitpoints and grant you a 'Mighty Stack'. Each Mighty Stack gives you a +6% Strength level boost (additive with bonuses from Prayers) and stacks up to five times, for a total of 40 Hitpoints lost and a +30% Strength boost. Once you're fully stacked, you'll stop taking extra damage and be free to slap your foes silly with one of the scariest Slash weapons in Gielinor.
Alternatively, if you're looking for a quick extra heal, you can use the Soulreaper Axe's special attack Behead. Behead consumes any Mighty Stacks you have, and for each stack consumed you’ll increase your accuracy by 6% and heal for 8 Hitpoints – coincidentally the same number of Hitpoints you exchange for a Mighty Stack! The best part is, you’ll get your healing even if the attack itself misses. Any Mighty Stacks that you have will be lost if you switch weapons, or if you go 10 ticks (6 seconds) without attacking.
The Axe is made up of four untradeable components (one from each boss) but can be traded to other players in its completed form. You'll need to have completed Desert Treasure II to equip it.
While 'hit things with big axe' has been a fun diversion, we're heading back to the arcane arts to wrap up our rewards section!
Ancient Sceptre Upgrades
Remember that Ancient Icon you went dry on for ages before upgrading it into an Ancient Sceptre? It's time to imbue that Sceptre with the power of the Ancient elements themselves…
Each of the post-quest bosses will drop an untradeable Sigil that coincides with their Ancient element: blood, ice, shadow and smoke. These Sigils can be combined with an Ancient Sceptre to create the Blood/Ice/Shadow/Smoke Ancient Sceptre.
These upgrades retain the +5% magic damage and +10% to Ancient Magicks effects, but will imbue the Sceptre with new effects depending on the element:
- Blood Ancient Sceptre: Blood magic can now overheal you by 10% of your Hitpoints.
- Ice Ancient Sceptre: Ice magic gains 10% accuracy on unfrozen, freezable targets.
- Shadow Ancient Sceptre: Shadow spells also drain Strength and Defence in addition to the target's Attack level.
- Smoke Ancient Sceptre: Smoke spells reduced healing received by 20% for 10 cycles on hit if the target is poisoned.
Upgraded Ancient Sceptres have an increased Magic requirement compared to their predecessor, requiring 75 Magic as well as the usual 60 Strength and 50 Attack to equip.
Alongside these, we'll be tweaking the Ancient sceptre and its upgraded variants to behave similarly to other untradeables on death in PvP, and attaching a repair cost to boot.
But wait, there's more…
Over the last week, you've been voting on whether or not you'd like to see harder, aspirational, Awakened variants of the post-quest bosses enter the game. That poll closed earlier this week, and we’re beyond excited to say that we will be developing these Awakened variants.
This means that in a few weeks (exact date TBD), you'll be able to challenge an Awakened version of each of the four post-quest bosses. To access them, you'll need to consume an Awakener's Orb. These are tradeable 'keys' of sorts and can be obtained as a drop from the regular bosses.
Although the Awakened bosses themselves won’t be available at launch, you'll be able to start receiving Orbs from today, giving you the chance to stock up while you prepare yourself for the challenge ahead.
Following their release, defeating the Awakened variant of all four bosses will reward you with the much-requested Blood Torva kit, in the form of an item you can use on all of your Torva pieces.
Here's a lovely turnaround showing off the new Blood Torva from all angles!
We have a bunch of ideas for these encounters, but we'll be keeping quiet until we get them out in front of you. In the meantime, good luck, have fun, and enjoy pondering your Orbs!
We've had a fantastic time working on and realising our newest Grandmaster quest, and we hope you're excited to experience all of the passion and work that's been poured in to Desert Treasure II - The Fallen Empire.
All that remains is to wish you all good luck. After all, you’ll need it…
Given the sheer size of Desert Treasure II, we only have a small handful of other changes for you this week:
- In case you missed it, you're now able to re-order your characters on the Jagex Launcher if you're using a Jagex Account. Nice!
- Players no longer need to enter their bank PIN after hopping worlds, assuming they have the relevant setting toggled. For players on the C++ client, you will be required to re-enter your PIN if you close and re-open the client, and we're working on a fix for this.
- Your hairstyle will no longer lose volume if you died wearing certain headgear.
- Leaves pruned off Farming patches are now tracked in the Loot tracker on the C++ client.
- We've recently added our New Official Client to the Jagex Launcher! Check out this post for more information!
- Players are no longer able to use kept-on-death Keys to drop items that are not usually dropped on death (such as Ironman Armour) into Gravestones.
This week marks the first week that we're including Bounty Hunter as part of the PvP World rota. If you have any feedback about the rota going forward, let us know and you'll look to make changes or tweaks where necessary!
The PvP rota has moved to Period B:
- 560 - (UK) - PvP World
- 319 - (US) - Bounty Hunter world
- 579 - (US) - High-Risk PvP World
- 561 - (UK) - Free-to-Play PvP World
- 580 - (US) - LMS Competitive
World 390 (AUS) for LMS Competitive has been de-activated with this rota.
World 569 (AUS) for Bounty Hunter has been de-activated with this rota.
The PvP Arena is using 'Zerker' loadouts in Ranked Duels and Tournaments this week.
You can also discuss this update on our official forums, on the 2007Scape subreddit, the Steam forums, or the community-led OSRS Discord in the #gameupdate channel. For more info on the above content, check out the official Old School Wiki.
Mods Abyss, Arcane, Archie, Argo, Ash, Ayiza, Boko, Bruno, Chilly, Crystal, Curse, Daizong, Dylan, Ed, Elena, Errol, Fed, Gecko, Gizmo, Goblin, Grub, Halo, Harold, Hend, Hornet, Husky, Jalo, Jerv, Keyser, Kieren, Kirby, Kurotou, Lenny, Light, Mack, Manked, Markos, Maylea, Meat, Moogle, Morty, Necro, Nox, Nylu, Other, Pumpkin, Redfield, Regent, Rice, Roq, Ry, Sarnie, Shroom, Sigma, Skane, Skylark, Sova, Squid, Starry, Stevew, Surma, Sween, Tide, Titus, Torrance, Tsourorf, Tyran, Veda, Vegard, West & Wolfy
The Old School Team.