Varlamore: The Final Dawn - Overview
Time for a Varlamore: The Final Dawn refresher!
If you can’t see the image above, click here!
As we zoom towards The Final Dawn, we thought you were all due a refresher on everything we’ve discussed so far.
Before we ‘delve’ into it, we have an announcement about the release date. When we first announced The Final Dawn back in September, we predicted an early spring launch. Since then, we’ve been hard at work fleshing out each new core activity and breathing life into the new areas you’ll explore – and we’ve discovered that to truly do this update justice, we’ll need a little more time. This means we’ll be releasing Varlamore: The Final Dawn in July of this year.
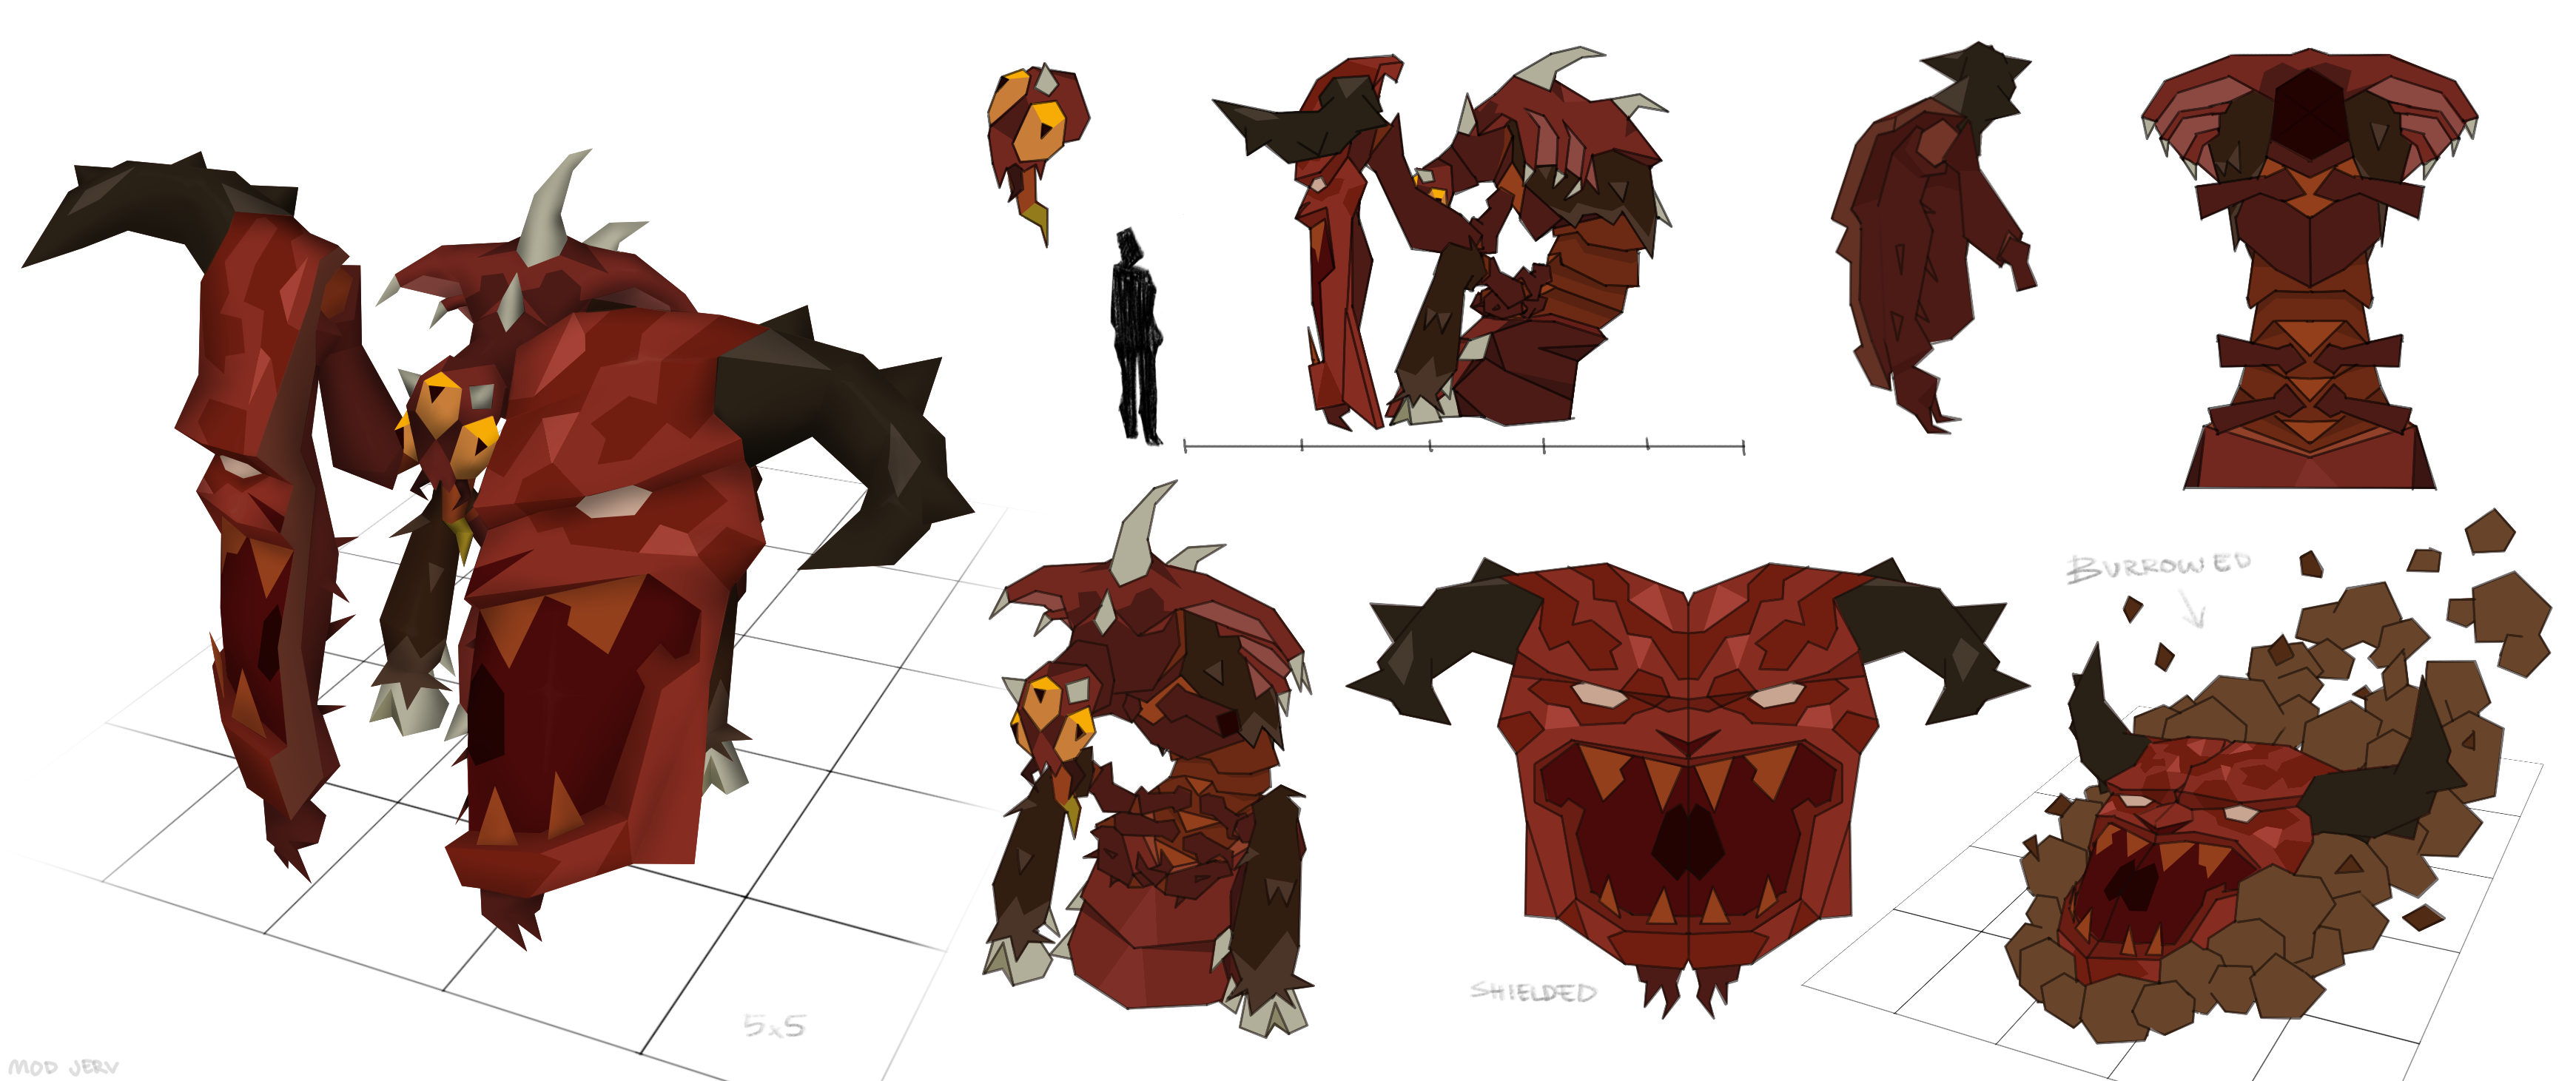
But for now, we have some new info to share, including this fantastic trailer from RuneFest, which gives you your first glance at our new Delve boss: the Doom of Mokhaiotl.
If you can’t see the video above, click here!

The final instalment of our Varlamore area expansion brings with it the final part of the accompanying quest series! The Master-tier finale is called The Final Dawn and will see you explore the history of Varlamore and the fate of the mysterious Old Ones.
We want you to discover the twists and turns of this thrilling story yourself, but we can share the rewards and quest requirements.
Quest Requirements
- 66 Thieving
- 52 Runecrafting
- 52 Fletching
- Completed The Heart of Darkness and Perilous Moons
We're also suggesting Combat level 80.
Rewards
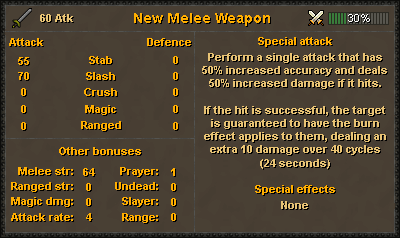
The mysterious New Melee Weapon has passed the reward poll, which means we’ll be forging ahead with the following:
If you can’t see the image above, click here!
This new weapon should sit roughly on par with the Dragon Scimitar, although the Scimitar will still be favoured in most situations thanks to its higher Strength bonus.
The New Melee Weapon’s real draw is its Special Attack, which costs 30% Special Attack Energy. The Special upgrades your next single attack with 50% increased Accuracy, and a monumental 50% extra damage if it hits. In addition, a successful hit will apply a burn effect to the target, dealing 10 damage over 40 ticks (24 seconds). This can stack, much like the Burning Claws, which means this weapon should tide you over until you’ve completed While Guthix Sleeps.
As a guaranteed quest reward, this weapon really leans into the themes of the storyline. Our aim here isn’t to shift metas or move needles - it’s to celebrate your completion of our newest quest series!
The New Melee Weapon will be untradeable, with the ability to repurchase it for 75,000 GP if lost. If this item is lost in PvP, the PKer will receive 75,000 GP.
Alongside the New Melee Weapon, you'll receive the following rewards:
- 55,000 Thieving XP
- 25,000 Runecraft XP
- 25,000 Fletching XP
- 55,000 Combat XP Lamp
- 3 Quest Points
- Access to The Doom of Mokhaiotl
Is that the ground trembling or our knees shaking as our first ever Delve boss tunnels into view?
If you can’t see the image above, click here!
Delve bosses are a totally different beast to what you’ve fought before. After defeating the Doom of Mokhaiotl (the Doom, for short), you’ll choose between leaving with your loot or fighting an even tougher version of the monster in hopes of a bigger prize. You can repeat this process as many times as you like, but the boss will become increasingly challenging, and the rewards increasingly lucrative. If you die, any loot you’ve earned so far will be lost, and you’ll be left empty-handed. But hey, no pain no gain, right?
The Mechanics
Our delve mechanics embrace the core concept of an enrage system, with some key differences.
When the Doom is defeated, it will descend further into its burrow. Defeating it on the deeper levels increases the chance of receiving unique drops, and some unique drops will only appear at deeper, more dangerous levels. You must make all your delve progress in a single run, as returning to the surface will reset you back to delve level 1.
The primary benefit to increasing your delve level is increasing your chance to snag unique rewards. The quantities of basic loot remain relatively consistent, however, which means that no matter how long you survive you won’t be overloaded with general resources.
There will be eight delve levels in total, each increasing in difficulty. You can keep repeating the hardest difficulty for as long as you can survive, but remember that if you do succumb to the Doom, you’ll lose everything.
The Doom of Mokhaiotl is an end-game boss that will be particularly fun for players at or above Combat Level 120, who either have or are close to getting their Infernal Cape. That said, this isn’t the Inferno, and the rewards are designed to reflect that.
Deeper levels increase the difficulty of the fight in several ways:
- Increased boss attack rate.
- Smaller reaction times for special attacks.
- Lingering arena state from previous levels.
- Environment changes, resulting in:
- Extra damaging effects, which can be avoided.
- Additional fight mechanics and special attacks.
Thanks to your thorough feedback, we’ll soon be polling a new round of rewards for this activity. Thank you all for your patience while we go back to the kitchen to cook up some new offerings.
If you’re skilling-inclined, you might want to swing by Auburnvale. This town on the north coast of Varlamore has had some tough times, but their beautiful forests are second-to-none. They’re also inhabited by magical ents, who are keen to help you recycle all those bows cluttering up your Bank.
Ents roam the forest, leaving offerings as they praise the land. Join them, and connect to nature while levelling your Fletching skills! Whittle totems in the likeness of the local wildlife, decorate them with leftover bows, crossbow stocks, and shields. If they impress the local ents, you’ll receive XP and other rewards.
This activity will be accessible from level 15 Fletching and beyond, although you’ll get the most out of it at around level 50.
Here’s the gameplay loop:
- Choose a scenic location to start making totems.
- Scout the area, keeping an eye out for which critters are most common nearby. For a top tier, rewarding totem, you should look to represent the three most common animals. They’ll move around from time to time, so you can’t always rely on the same combination.
- Gather logs. The higher tier the wood, the longer your totem will stand, allowing you to keep the site active for more ent visitors without maintenance. This in turn allows you to maintain more sites simultaneously, leading to greater XP per hour!
- Whittle your log into a blank pole, choose which animals to represent, and carve them on the totem.
- Either fletch strung or unstrung bows, crossbow stocks, and shields – or use some you’ve made earlier! The more decorations you have, the more XP you’ll gain. Don’t worry about lugging it all around with you, there are some convenient Banks along the route to pick up pre-made items.
- Over time, ents will pass by to pay their respects and leave offerings. There’s no need for you to wait around for them – they are famously not too hasty – so you might as well go make some other totems elsewhere. Be sure to check back in, as your totems don’t stay standing forever. Offerings, however, will last until you pick them up. Phew!
- Collect your offerings to receive XP and (maybe) some unique items, all based on your totem score.
- There'll also be a little downtime while running between your totem sites. It’s the perfect time to do some Fletching on the go, or partake in other activities like Alching, glassblowing, or Herblore. Win, win, win!
While we’re here, we wanted to clarify a couple of points that came up during feedback.
Firstly, it might seem a bit weird that the ents will reward you for offering up items made of… wood. To this we say: ents are ancient, mysterious creatures, and very few understand their true motives. What we do know is that they value the natural cycle of life. They know that all living things must take from the earth and someday give back in return. By returning wooden structures to the land in the form of totems, you’re playing your part in completing that cycle. Good for you!
There was also some concern that this would be a dailyscape activity. We want to assure you that this isn’t the case. The activity is designed to have you running from point to point with little to no downtime. You can use your running time to Fletch, or alch, or do any other crafty activity, but don’t misread this as waiting time. Ents may be slow, but they’re always moving, and your totems won’t go unchecked for long.
Rewards
In December we shared potential rewards for this activity, which you can see here. Since then, we've taken all your feedback and worked to narrow the collection down to a handful of core rewards. We'll be ready to share these really soon, so stay tuned!
The Custodia Pass is a hostile stretch of rocky ground that marks the border between Varlamore and Kourend – and it’s the perfect hunting ground for Slayer enthusiasts. After completing a quest, you’ll gain access to a new Slayer Dungeon teeming with creatures to slay.
You’ll also come into contact with an enemy yet to be seen on mainland Gielinor: the Custodian stalker.

If you can’t see the image above, click here!
These bipedal creatures with large antlers and clawed hands prowl the depths of the Custodian Slayer Dungeon. Left to mutate for millennia, their fearsome appearance is matched only by their insatiable bloodlust. Don’t underestimate these beasts – they’ve got brains as well as brawn.
You'll encounter three tiers of stalkers:
| Tier | Slayer Level |
| Juvenile | 54 |
| Mature | 67 |
| Elder | 76 |
Each type will have low-mid defence teamed with a heftier HP pool, making it easier to rock up and bash out your Slayer Tasks with whatever your preferred kit might be. We're also planning to add an elemental weakness, so Magic users are in luck! Our research team hasn’t yet returned with the exact stats of the Custodian Stalkers – don’t worry, we’re sure they’re all fine – but we wanted to give you a peek at the reward regardless.
Rewards
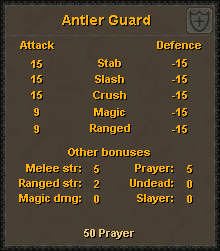
The Antler Guard has officially passed the poll, although its name may change between now and launch. Let’s remind ourselves what this item has to offer:
If you can’t see the image above, click here!
We intend the Antler Guard to keep you going until you get the Dragon Defender, and it’ll be particularly useful for players who enjoy the RCB or Hunter Crossbow. Those of you bringing Proselyte along to Slayer Tasks will also enjoy the +5 Prayer bonus. It’s like having a Proselyte Cuisse in your offhand!
There’s more than one new boss lurking in the Tlati Rainforest. We shared a glimmer of this shiny boy in our last summit, and since then he’s been getting polished up and ready to scuttle onto your screens when The Final Dawn releases.
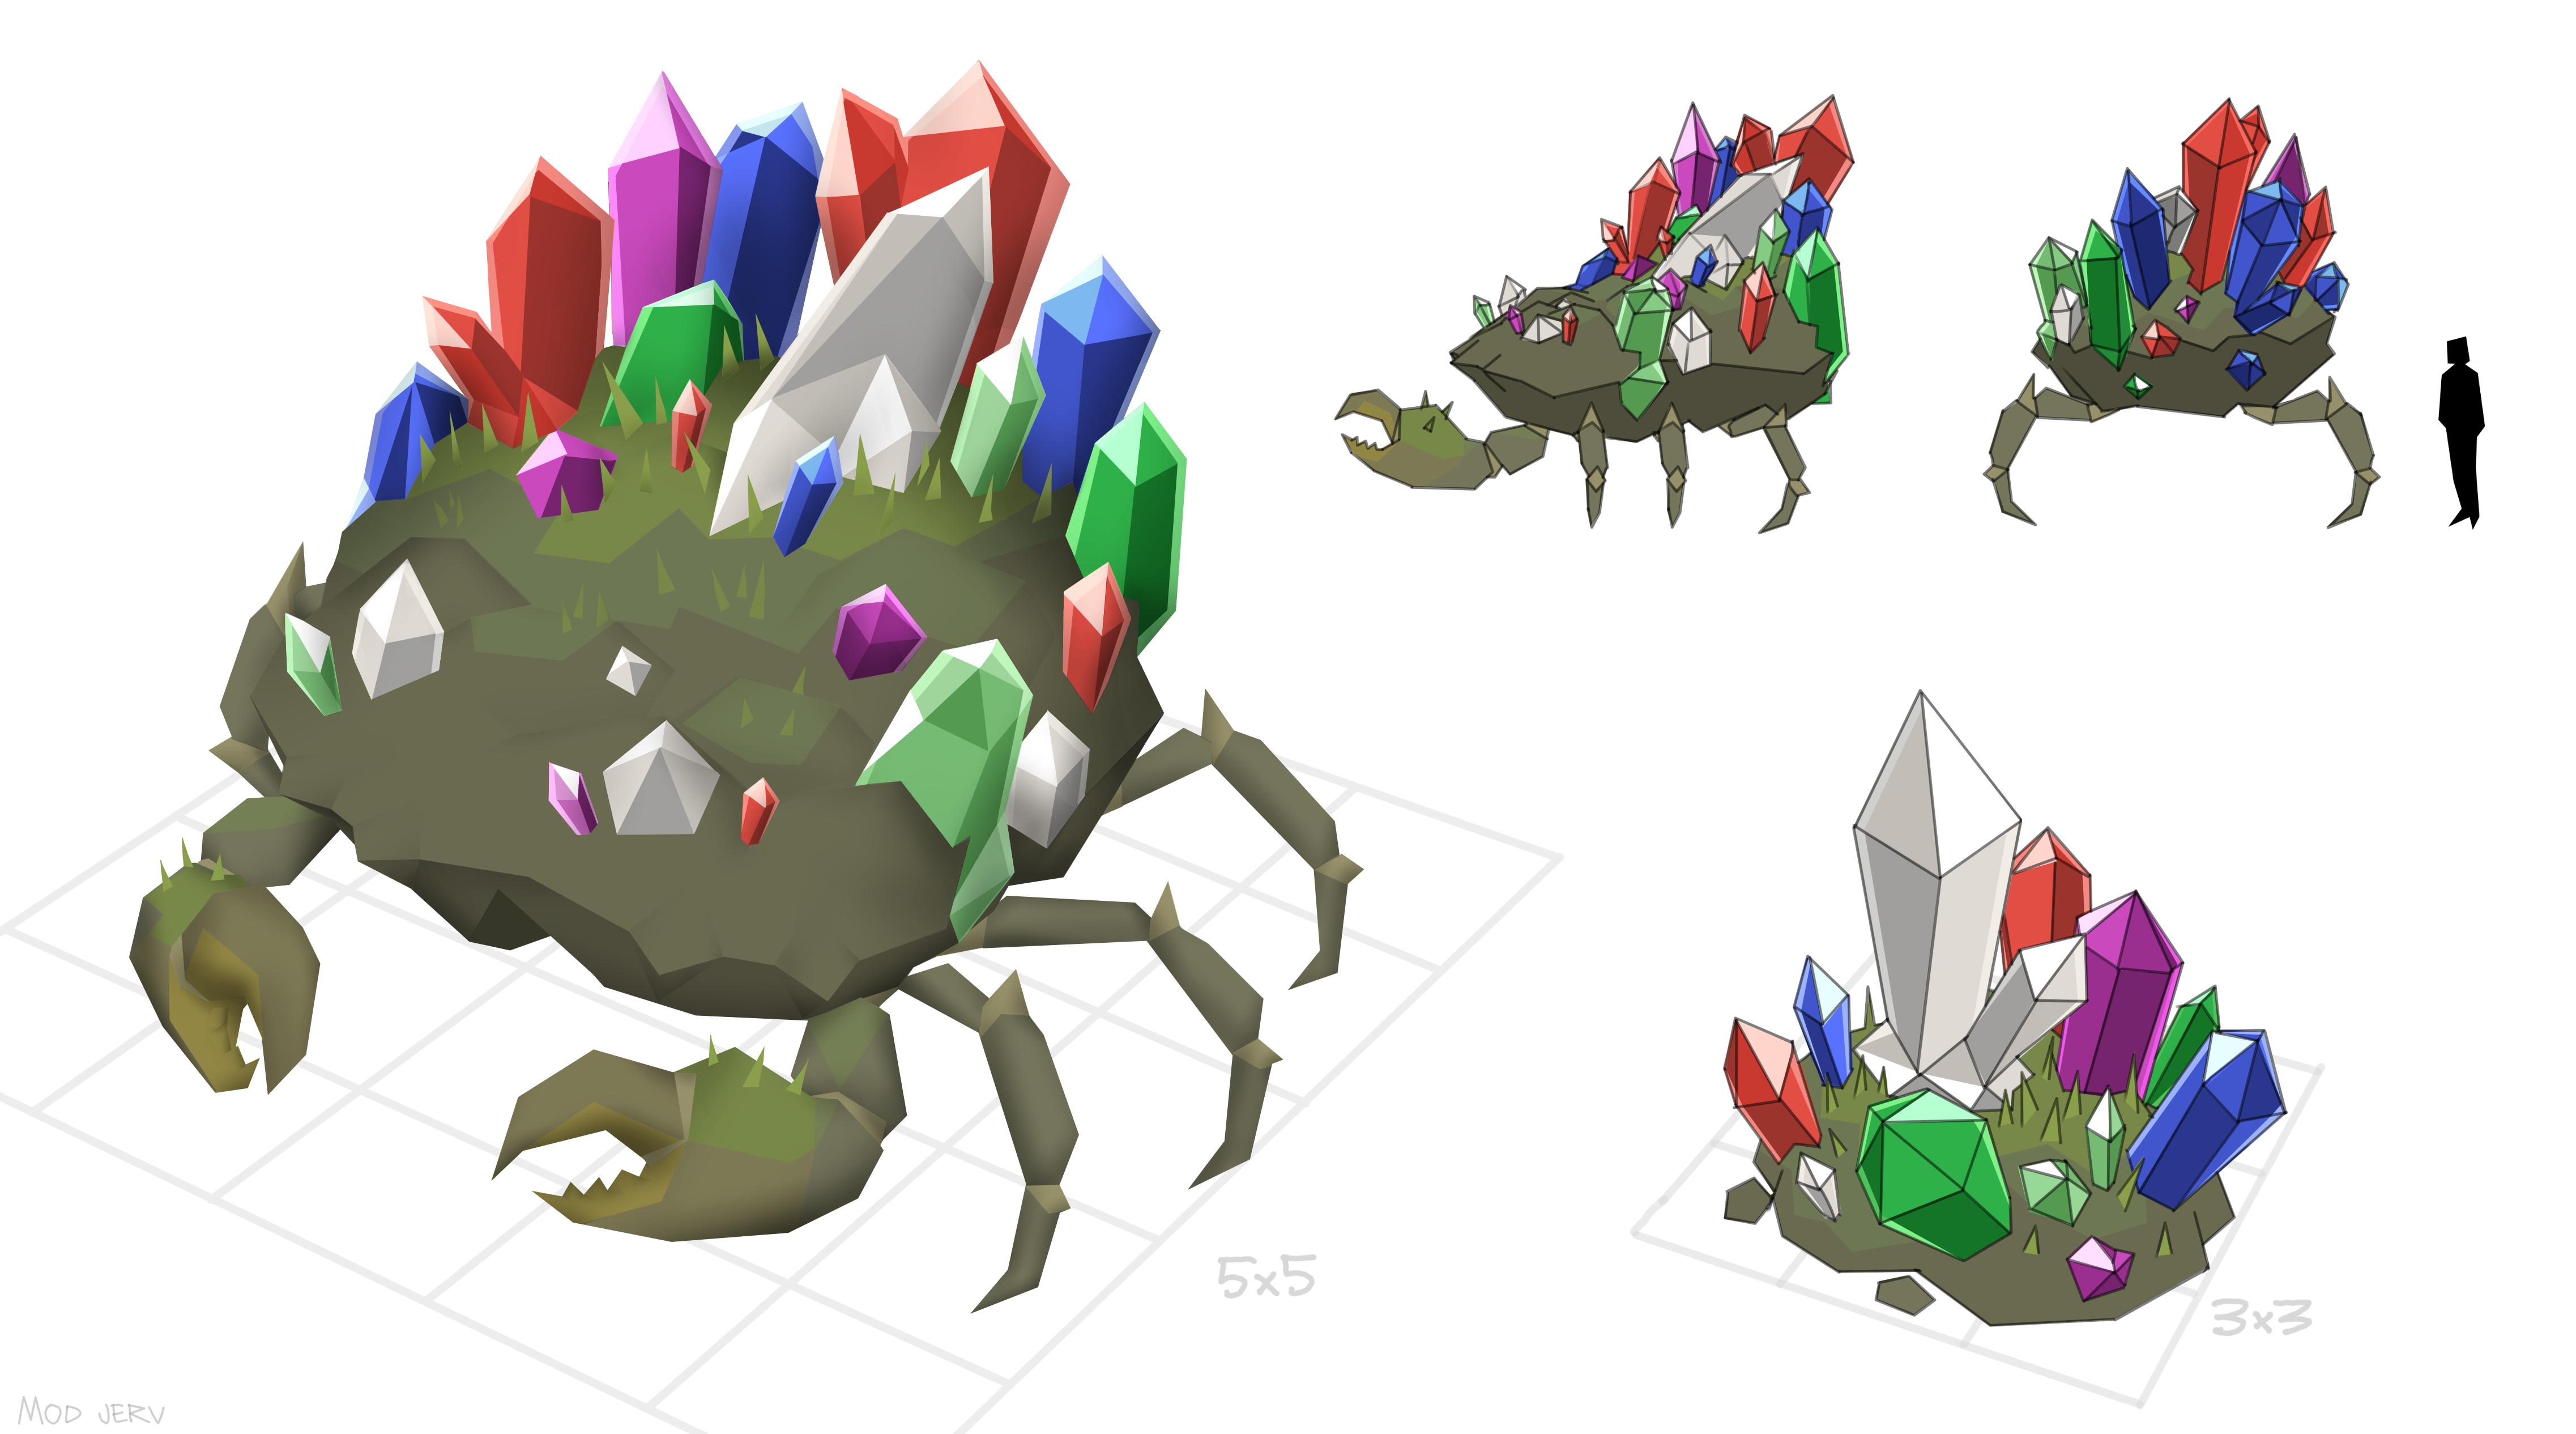
If you can’t see the image above, click here!
This crystalized crustacean is capable of spawning in multiple locations throughout the rainforest, so prepare for travel if you plan to track it down. We also suggest you bring a crack team of fellow fighters, as Gemstone Crab is designed to train your combat stats collaboratively. The MVPs will receive some gems by way of reward, but beware – it’ll take some effort to crack that shiny shell.
You’ll also encounter a new type of nagua in the Tlati Rainforest, rounding out the spiritual trio. You’ll be able to fight them as a lesser nagua Slayer Task once you’ve completed The Final Dawn.
We recently polled their unique reward, and it passed! Here's what you need to know about this new weapon:
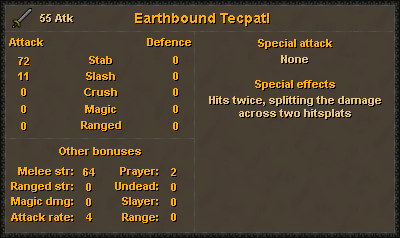
If you can’t see the image above, click here!
This unique twin weapon will act as the Stab equivalent of the Sulphur Blades and Glacial Temotli, completing the set. Like their equivalents, they will hit twice per attack, rolling damage normally and splitting it across two hitsplats.
That’s all we have to update you on when it comes to Varlamore but do have a read through the rest of our Runefest reveals. Discussions around the new delve boss and Fletching activity rewards are just around the corner, so stay tuned for those.
You can also discuss this update on the 2007Scape subreddit, the Steam forums, or the community-led OSRS Discord in the #gameupdate channel. For more info on the above content, check out the official Old School Wiki.
Mods Abe, Abyss, Arcane, Archie, Argo, Ash, Ayiza, BigRig, Blossom, Boko, Bruno, Chilly, Criminal, Crystal, Curse, Daizong, Dylan, Ed, Elena, Enigma, Entropi, Errol, Gecko, Gengis, Gizmo, Goblin, Grub, Halo, Harold, Hend, Hornet, Husky, Jalo, Jerv, Keyser, Kieren, Kirby, Kurotou, Leebleh, Lenny, Light, Liron, Lykos, Mack, Manked, Markos, Maylea, Moogle, Morty, Necro, Nin, Nox, Nylu, Ori, Other, Philomel, Pumpkin, Rach, Redfield, Rice, Roq, Ry, Saiyan, Sarnie, Shogun, Shroom, Sigma, Skylark, Smithy, Sova, Squid, Starry, Suharun, Surma, Sween, Tide, Titus, TJ, Tsourorf, Tyran, Veda, Vegard, West, Wolfy & Yume
The Old School Team.